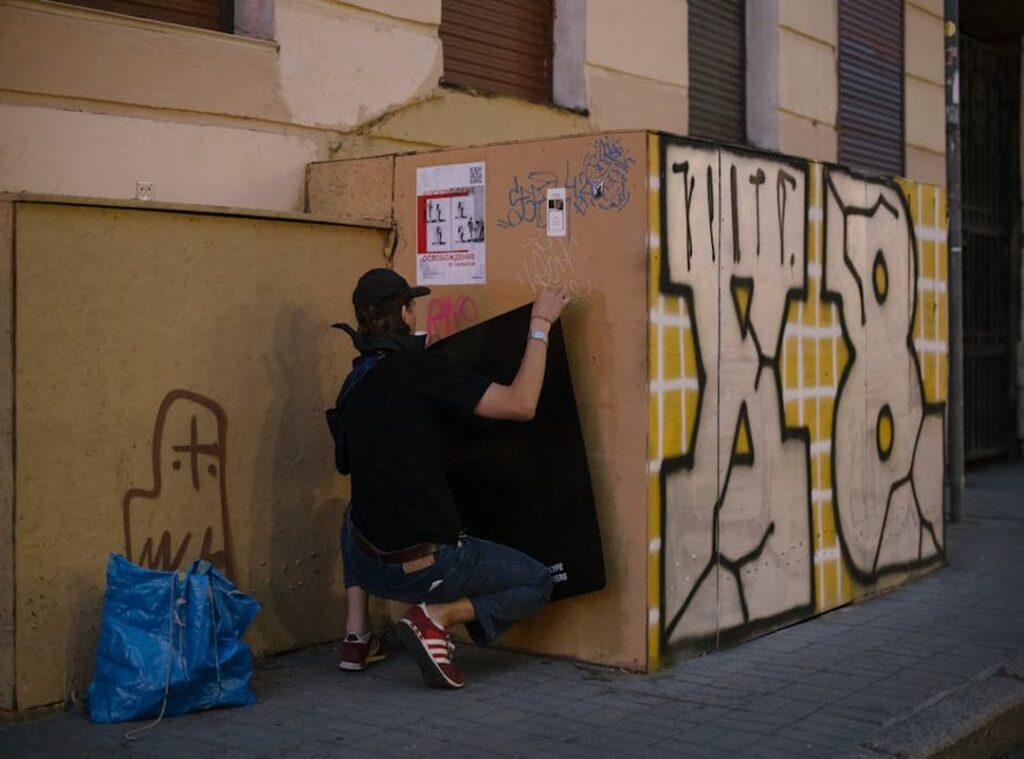
You see a dull, blank wall and suddenly it’s transformed into a vibrant, eye-catching mural. That’s the magic of street art, and it can feel intimidating, right?
Graffiti seems complex with its high barrier to entry and confusing culture. But what if I told you it doesn’t have to be that way? This guide is here to demystify callejero graffitis faciles for absolute beginners.
We’ll break it down step by step, using foundational techniques that artists have relied on for decades. You’ll learn about choosing the right tools, mastering basic can control, understanding letter structure, and how to practice safely and legally. Let’s get started.
Choosing Your Arsenal: A Beginner’s Guide to Spray Cans and Caps
When I first started, I grabbed a can of Rust-Oleum from the hardware store. It was cheap, and I thought it would do the job. Big mistake.
The paint was too thick, and the pressure was all over the place. I ended up with more paint on my hands than the wall.
Artist-grade spray paints like Montana or Molotow are a different story. They have consistent pressure, better pigments, and valve systems that give you more control. For beginners, low-pressure cans are the way to go.
They’re more forgiving and help you learn line work without getting frustrated.
Essential Types of Spray Can Caps (Nozzles)
Fat caps are great for filling large areas quickly. Skinny caps, on the other hand, are perfect for outlines and details. Specialty caps, like needle caps, offer even finer control.
Start with a few of each to see what works best for you.
Beginner’s Shopping List
- A can of black: Black is versatile and essential for any project.
- A can of white: White is great for highlights and corrections.
- A fill color: Choose a color you love; it’ll make your callejero graffitis faciles pop.
- A pack of assorted caps: Get a variety to experiment with.
- A respirator mask: Don’t skimp on this. A high-quality mask protects you from fumes and particulates.
- Gloves: Keep your hands clean and your grip steady.
Safety gear is crucial , and a good respirator mask is a must. Trust me, you don’t want to be breathing in those fumes.
Pro Tip
Shake your can for at least two minutes before use. This ensures the paint is well mixed. After you’re done, clear the cap by spraying it upside down.
This keeps the nozzle from clogging and makes your next session smoother.
Mastering the Can: Essential Spray Paint Control Techniques
Can control is the first fundamental skill you need to master. It’s all about how you hold and move the can.
Distance from the wall affects line thickness and opacity. Closer means sharper and thinner lines, and farther gives you softer, wider lines.
To practice basic lines, start with a simple surface like cardboard or a legal wall. Draw straight lines, curved lines, and circles.
First, try drawing straight lines. Keep your arm steady and move it smoothly.
Next, practice curved lines. Use your whole arm, not just your wrist.
Finally, draw some circles, and start small and gradually increase the size.
Fading or creating gradients is a core technique for fills. Vary the distance and spray angle to get that smooth transition.
A flare tag is a classic technique. It involves a quick, sweeping motion to create a line that tapers at the ends. Practice this by starting with a thick line and quickly moving the can away as you finish the stroke.
Here’s a practice drill: create a can control board. Fill it with different lines, dots, and shapes. This builds muscle memory and helps you get a feel for the can.
Smooth, consistent arm movements are key. Moving just your wrist is a common beginner mistake. Use your whole arm for better control and smoother lines.
Try callejero graffitis faciles to get a feel for more complex designs. Start with simple tags and gradually add more details.
Keep practicing, and consistency is everything.
Developing Your Style: From Simple Tags to Complex Lettering
Let’s talk about the foundation of all graffiti: the tag. A tag is a stylized signature and the basis for more complex pieces. It’s where you start to make your mark.
Beginners should start with simple, legible letters using their own handwriting. Don’t jump into complex style elements just yet. Master the basics first.
Once you’re comfortable, move on to creating a ‘throw-up’ or ‘throwie.’ These are simple, bubble-style letters that can be painted quickly, usually with an outline and a one-color fill. They’re perfect for quick, impactful work.
Now, let’s break down the process. Use a simple word and build block or bubble letters around a basic ‘skeleton’ of the letter. This helps you understand the structure and flow.
Letter weight, balance, and flow are crucial. Letters should interact with each other to create a cohesive piece. Think of it like a dance; each letter has a role and they need to move together.
Practice in a sketchbook, or ‘blackbook,’ before touching a wall. This is where you develop your tag and letter style. It’s like how to develop long term weight loss habits; consistency and practice lead to mastery.
Callejero graffitis faciles are a great way to start. They’re simple, easy to execute, and help you build confidence.
Remember, the key is to keep it simple at first. As you get more comfortable, you can add more complexity. The benefits?
You’ll have a solid foundation, and your skills will grow naturally.
The Unwritten Rules: Practicing Graffiti Legally and Respectfully
Let’s get one thing straight, and illegal graffiti is a big no-no. It can land you in serious legal trouble, and it’s just not worth it.
(Trust me, you don’t want to be that person.)
Instead, let’s talk about legal walls or permission walls. These are spaces where you can practice your art without breaking the law. To find them, check out online forums, local art groups, or even ask around at community centers.
You might be surprised by how many options there are.
Practicing on disposable surfaces is also a smart move. Think large cardboard boxes, plywood sheets, or canvas. This way, you can perfect your technique without any risk.
Now, about street art etiquette, and it’s simple but important. Never paint over another artist’s work unless your piece is significantly better.
(And even then, be respectful.) Also, avoid sensitive locations like places of worship, memorials, and private homes.
Becoming a respected artist isn’t just about getting your name up; it’s about skill and respect for the craft and community. Take the time to learn and grow. (Think of it like training in a martial arts movie—patience and dedication are key.)
Remember, callejero graffitis faciles can be a great starting point, but always aim to improve and innovate. With the right approach, you can make a name for yourself and contribute positively to the art scene.
Your Journey as a Street Artist Starts Now
This guide covered the essential steps: getting the right gear, mastering can control, developing letterforms, and practicing responsibly. The key to improvement is consistent practice. Start with a sketchbook and move to legal practice surfaces.
You might feel hesitant, but now you have the foundational knowledge to begin your artistic journey with confidence. callejero graffitis faciles.
Challenge yourself to grab a sketchbook and design your first tag today. Or find a piece of cardboard and practice your first lines.
Remember, every blank space is an opportunity for self-expression and transformation into art.
 Johnstere Shackelfords has opinions about dietary guidelines and plans. Informed ones, backed by real experience — but opinions nonetheless, and they doesn't try to disguise them as neutral observation. They thinks a lot of what gets written about Dietary Guidelines and Plans, Meal Planning and Preparation, Fitness Routines and Workouts is either too cautious to be useful or too confident to be credible, and they's work tends to sit deliberately in the space between those two failure modes.
Reading Johnstere's pieces, you get the sense of someone who has thought about this stuff seriously and arrived at actual conclusions — not just collected a range of perspectives and declined to pick one. That can be uncomfortable when they lands on something you disagree with. It's also why the writing is worth engaging with. Johnstere isn't interested in telling people what they want to hear. They is interested in telling them what they actually thinks, with enough reasoning behind it that you can push back if you want to. That kind of intellectual honesty is rarer than it should be.
What Johnstere is best at is the moment when a familiar topic reveals something unexpected — when the conventional wisdom turns out to be slightly off, or when a small shift in framing changes everything. They finds those moments consistently, which is why they's work tends to generate real discussion rather than just passive agreement.
Johnstere Shackelfords has opinions about dietary guidelines and plans. Informed ones, backed by real experience — but opinions nonetheless, and they doesn't try to disguise them as neutral observation. They thinks a lot of what gets written about Dietary Guidelines and Plans, Meal Planning and Preparation, Fitness Routines and Workouts is either too cautious to be useful or too confident to be credible, and they's work tends to sit deliberately in the space between those two failure modes.
Reading Johnstere's pieces, you get the sense of someone who has thought about this stuff seriously and arrived at actual conclusions — not just collected a range of perspectives and declined to pick one. That can be uncomfortable when they lands on something you disagree with. It's also why the writing is worth engaging with. Johnstere isn't interested in telling people what they want to hear. They is interested in telling them what they actually thinks, with enough reasoning behind it that you can push back if you want to. That kind of intellectual honesty is rarer than it should be.
What Johnstere is best at is the moment when a familiar topic reveals something unexpected — when the conventional wisdom turns out to be slightly off, or when a small shift in framing changes everything. They finds those moments consistently, which is why they's work tends to generate real discussion rather than just passive agreement.